React Todo example App with secure NoSQL API using Auth0.com

In this blog post, we'll show how to develop and deploy a full-stack React Todo App with user authentication and secure database REST APIs.
Learning by (to)doing
The concept of a Todo App is a popular way of learning how a specific technology stack works to solve an intuively understood problem - the ubiquitous todo list.
- ◻ Finish homework
- ☑ Buy milk
- ☑ Call mum
There are countless variations of todo app examples available, each with its own unique features and implementation approaches.
We will provide a full-stack practical example with a React client Todo App integrated with Auth0 for authentication and backend written using codehooks.io (API and NoSQL database).
Our code example is a modified version of an existing but simpler React Todo App written by Samuel Gamage.
The following technologies will be used:
- User authentication and secured REST API by Auth.com
- Backend NoSQL database and API in Node.js by codehooks.io
- UI components using Material UI version 5
- Deployment of the React Todo App to Github Pages
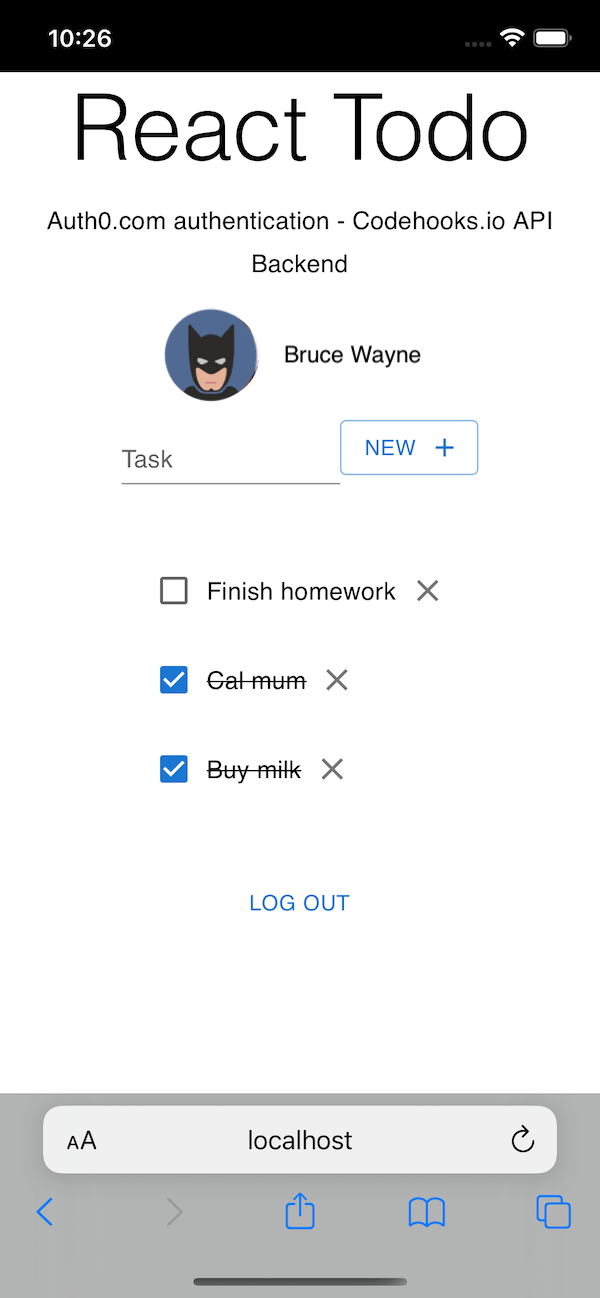
The finished React Todo App
The finished result of our React Todo App user interface is shown in the screenshot below. Notice the (authenticated) user profile and the following personal todo items fetched dynamically from the database via a REST API.
Click here to try out the live example of the React Todo App.
The full source code is available at GitHub here.
Cool, we've seen how the demo application works. Let's dig into the details of how to create this full-stack React Todo App from scratch.
3 easy steps to create the React Todo App
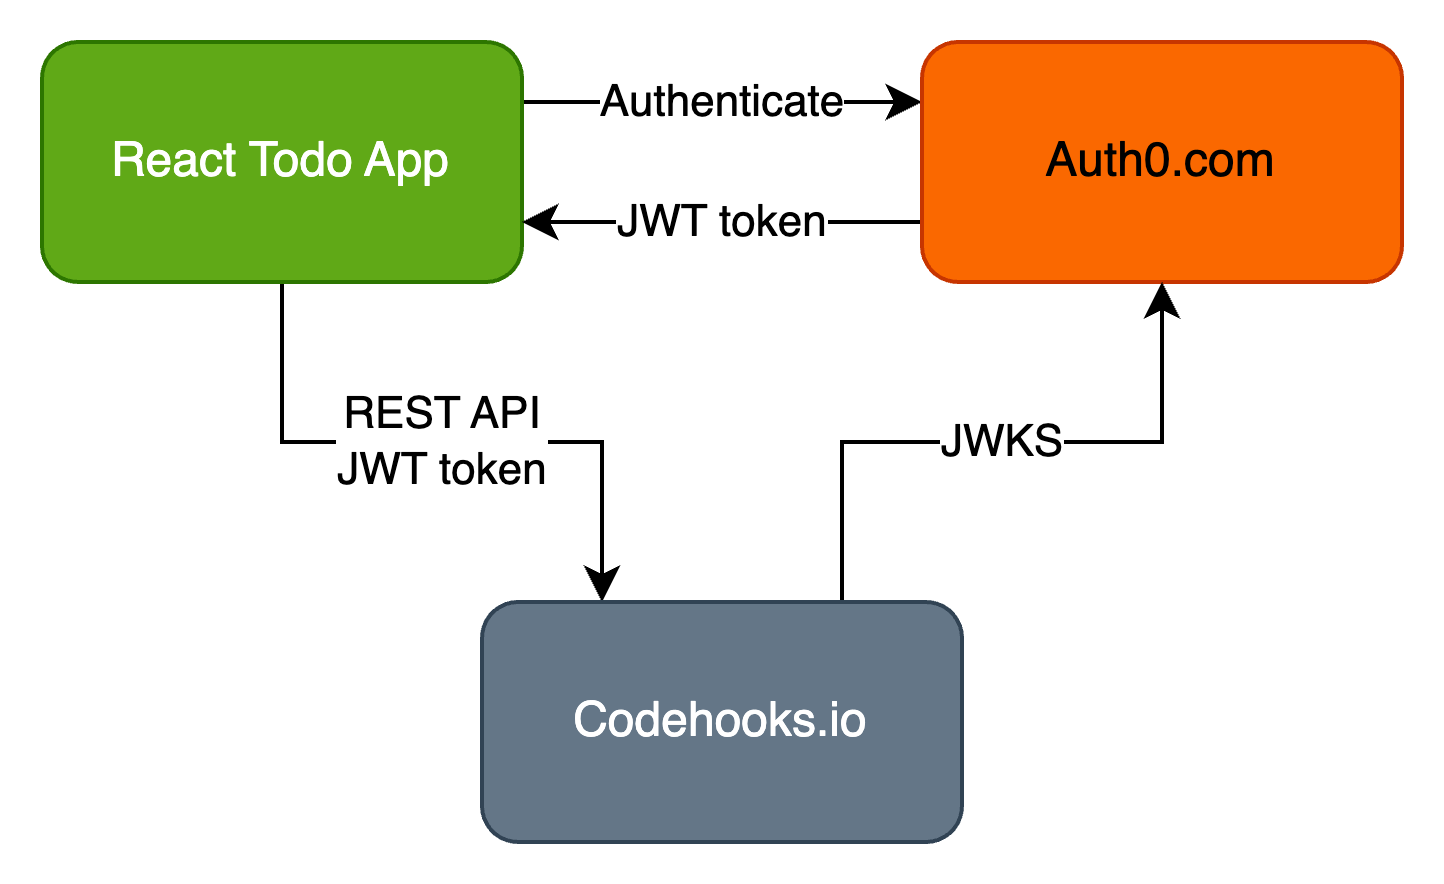
The React Todo App is a SPA (Single-Page Application) with 3 major components.
- User authentication
- Backend API and database
- React frontend client application
The rest of this blog post will show you how to complete each step to develop and deploy the complete authenticated full-stack React Todo App.
Application architecture
The major application components are depicted in the illustration below.
Lets start with the first major building block; adding Auth0 user authentication to the React App.
Step 1. User authentication
In this example we're using Auth0.com to implement user authentication.
Auth0.com is a leading identity management platform that simplifies the process of adding secure user authentication and authorization to applications.
There are alternatives to Auth0.com. For example Clerk.com is also a popular identity management platform that provides authentication and authorization solutions for developers. An new open source alternative is stack-auth.com which has many powerful features and integrations.
Set up an Auth0 account
- Go to the Auth0 website auth0.com and sign up for a free account.
- Once you're logged in, you'll be taken to the Auth0 Dashboard.
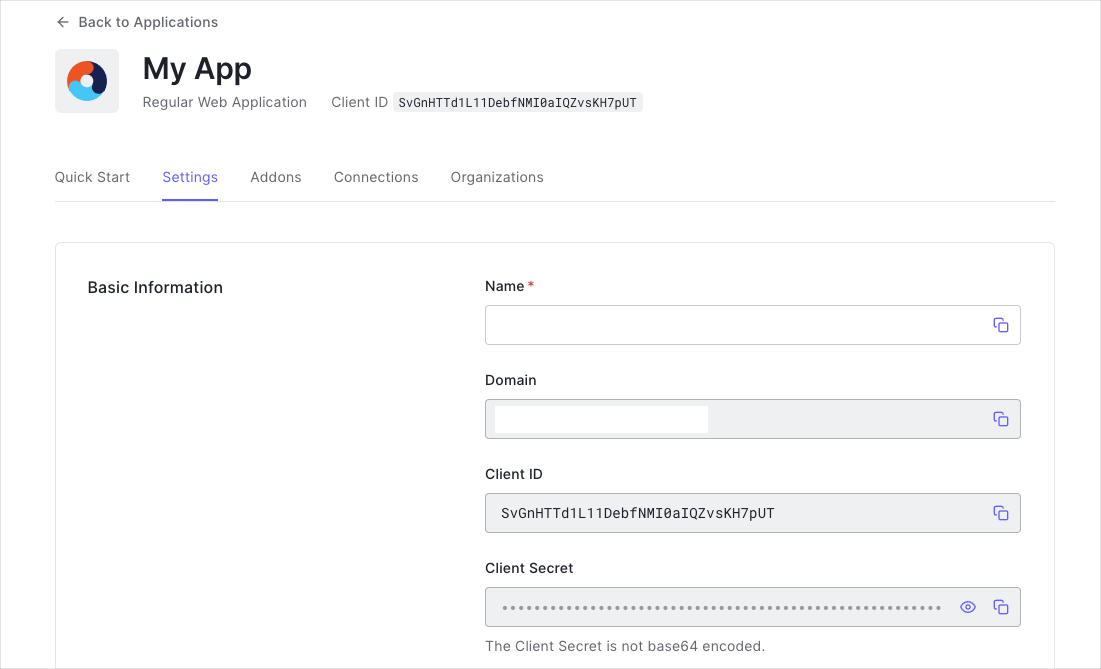
Create a new Auth0 Application
- In the Auth0 Dashboard, click on the "Applications" tab and then click the "Create Application" button.
- Give your application a name and select the application type as "Single Page Application".
- Under the "Settings" tab for your application, enter the appropriate values for "Allowed Callback URLs", "Allowed Logout URLs" and "Allowed Web Origins." These URLs will depend on your specific application setup.
- Take note of the Application Domain and Client ID, this will be used in the React App config setting below. The Client Secret should not
be shared or distributed in any way.
This completes the necessary setup in the Auth0 Application for now.
The next step is to set up the REST API and database backend for the React App. In the following section, please pay attention to the JWKS setting which enables the Auth0 backend integration.
Step 2. Backend API and database
Install the Codehooks CLI
The Codehooks.io CLI is used to create and deploy a backend application and API.
In the example React Todo example source code, the backend application is located in the sub directory /backend with the two main files ìndex.js and authHelper.js which we will discuss in the following.
To get started with Codehooks development we need to install the Codehooks CLI first.
npm install codehooks -g
Create a new backend application
With the CLI command coho create we can create new Codehooks applications.
In this example we'll call our backend application backend.
coho create backend
This command creates a default application file ìndex.js and this can be replaced by the two files in the example project ./backend directory.
Auth0 integration using JWKS
The React Todo App (shown in the step 3 section next) will call the backend application API with an "Authentication" HTTP header containing a JWT token from the Auth0 authentication flow (like this: Bearer {{insert JWT token}}).
In order to verify the JWT token for each API call, we add a "JWKS endpoint" from Auth0 which codehooks.io can use. Check out JSON Web Key Sets (JWKS) to learn more.
Run the CLI command to set up the correct JWKS endpoint for your Auth0 Application.
coho jwks 'https://<YOUR_AUTH0_DOMAIN>/.well-known/jwks.json'
The complete code for the backend Todo Application data API is shown below. The API has simple CRUD operations for listing, creating, updating and deleting Todo items.
/*
 * React Todo API and NoSql database backend
 */
import { app, Datastore } from 'codehooks-js'; // Standard Codehooks.io lib
import { userProfileFromAuth0 } from './authHelper.js';

// middleware to fetch the user profile into the req.user property
app.use('/todo*', userProfileFromAuth0);
// GET Todo items
app.get('/todo', async (req, res) => {
  console.log('Get todo');
  const db = await Datastore.open();
  db.getMany(
    'tododata',
    { owner: req.user.email }, // query Todo items by authenticated user.email
    { sort: { completed: 1, _id: -1 } }
  ).json(res);
});
// POST a new Todo item
app.post('/todo', async (req, res) => {
  console.log('Save todo for', req.user.email, req.body);
  const { email: owner } = req.user;
  const task = { ...req.body, owner }; // stamp Todo item with user email for data isolation
  const db = await Datastore.open();
  const result = await db.insertOne('tododata', task);
  res.json(result);
});
// PUT Todo item update
app.put('/todo/:id', async (req, res) => {
  try {
    console.log('Update todo for', req.user.email, req.body);
    const task = req.body;
    const { id } = req.params;
    const db = await Datastore.open();
    const result = await db.updateOne('tododata', id, task);
    res.json(result);
  } catch (error) {
    res.status(400).send(error.message);
  }
});
// DELETE a Todo item
app.delete('/todo/:id', async (req, res) => {
  try {
    const { id } = req.params;
    console.log('Delete todo for', req.user.email, id);

    const db = await Datastore.open();
    const result = await db.removeOne('tododata', id);
    res.json(result);
  } catch (error) {
    res.status(400).send(error.message);
  }
});

export default app.init(); // Bind functions to the serverless cloud
Get user profile from JWT token
Data for various users are isolated in the database with the owner/email property of each item.
In order to get the actual email for an authenticated user (JWT) we can fetch the user profile from a valid JWT token sent in the HTTP headers.
This is implemented as a middleware app.use('/todo*', userProfileFromAuth0) used in the main backend Application index.js shown above.
Notice how we can cache (20 minutes) the user profile result in the Codehooks key-value database. This avoids flooding Auth0.com with unnecessary requests.
import { Datastore } from 'codehooks-js'; // Standard Codehooks.io lib
import fetch from 'node-fetch';

// middleware to get Auth0 user info in request
// all routes will now have access to user info in req.user
// adapt this to your own needs

export const userProfileFromAuth0 = async (req, res, next) => {
  try {
    const { authorization } = req.headers;
    if (authorization) {
      const token = authorization.replace('Bearer ', '');
      const conn = await Datastore.open();

      // try to load user from codehooks.io key/value store
      const user = await conn.get(`token-${token}`, { keyspace: 'sessions' });

      // found in cache?
      if (user) {
        req.user = JSON.parse(user);
        return next();
      }

      // fetch user from Auth0 API
      const resp = await fetch(`https://<YOUR_AUTH0_DOMAIN>/userinfo`, {
        headers: {
          Authorization: `Bearer ${token}`,
        },
      });
      req.user = await resp.json();

      // store in key/value store for twenty minutes
      conn.set(`token-${token}`, JSON.stringify(req.user), {
        keyspace: 'sessions',
        ttl: 1000 * 60 * 20,
      }); // ttl twenty minutes
    } else {
      return res.status(401).send('Missing HTTP header');
    }
    next();
  } catch (error) {
    next(error);
  }
};
Deploy the backend database API
Before deployment of the database backend we need to install the Codehooks package. From the backend directory run:
npm i codehooks-js
Now we can deploy the backend by running the Codehooks "deploy" CLI command:
coho deploy
Which should output:
Project: <YOUR_PROJECT_ID>  Space: dev
Deployed Codehook successfully! 🙌
Run the coho info --examples to inspect API tokens and example REST API endpoints.
This concludes the backend for the React Todo App and finally we can start to build the frontend client application.
Step 3. React frontend client application
Use create-react-app to kick-start the React App
npx create-react-app todo
cd todo
// start your favorite code editor in the currect directory
code .
Install packages
npm install @auth0/auth0-react
npm install @mui/material @emotion/react @emotion/styled
npm install @mui/icons-material
npm install gh-pages
The rest of the steps inolves replacing index.js and App.js, and add the ./components directory with the code from the React Todo App.
To save time and kick-start your development you can clone the GitHub repository instead.
git clone https://github.com/RestDB/codehooks-io-react-todo.git
cd codehooks-io-react-todo
npm install
npm start
Setup config credentials for Auth0 and REST API
Open the the React App config.json file and enter your application credentials like shown in the example below:
{
  "domain": "YOUR_AUTH0_DOMAIN",
  "clientId": "YOUR_AUTH0_CLIENT_ID",
  "redirect": "/codehooks-io-react-todo",
  "apiOrigin": "https://<YOUR_CODEHOOKS_PROJECT_ID>.api.codehooks.io/dev",
  "scope": "read:current_user create:current_user_metadata profile email"
}
The React Todo App entrypoint code (with Auth0.com integration) is shown in the code example below.
import React from 'react';
import ReactDOM from 'react-dom';
import './index.css';
import App from './App';
import { Auth0Provider } from '@auth0/auth0-react';
import config from './config.json';

const domain = config.domain; // YOUR_AUTH0_DOMAIN
const clientId = config.clientId; // YOUR_AUTH0_CLIENTID
const scope = config.scope; // "read:current_user create:current_user_metadata profile email"

// hack to make it work with subdirectory for deployment on github pages
const redirectUri =
  window.location.origin.indexOf('localhost') !== -1
    ? window.location.origin
    : `${window.location.origin}${config.redirect}`;

ReactDOM.render(
  <Auth0Provider
    domain={domain}
    clientId={clientId}
    cacheLocation="localstorage"
    authorizationParams={{
      redirect_uri: redirectUri,
      audience: `https://${domain}/api/v2/`,
      scope: scope,
    }}
  >
    <App />
  </Auth0Provider>,
  document.getElementById('root')
);
Start the Todo App
To test the React Todo App on your local development machine run:
npm start
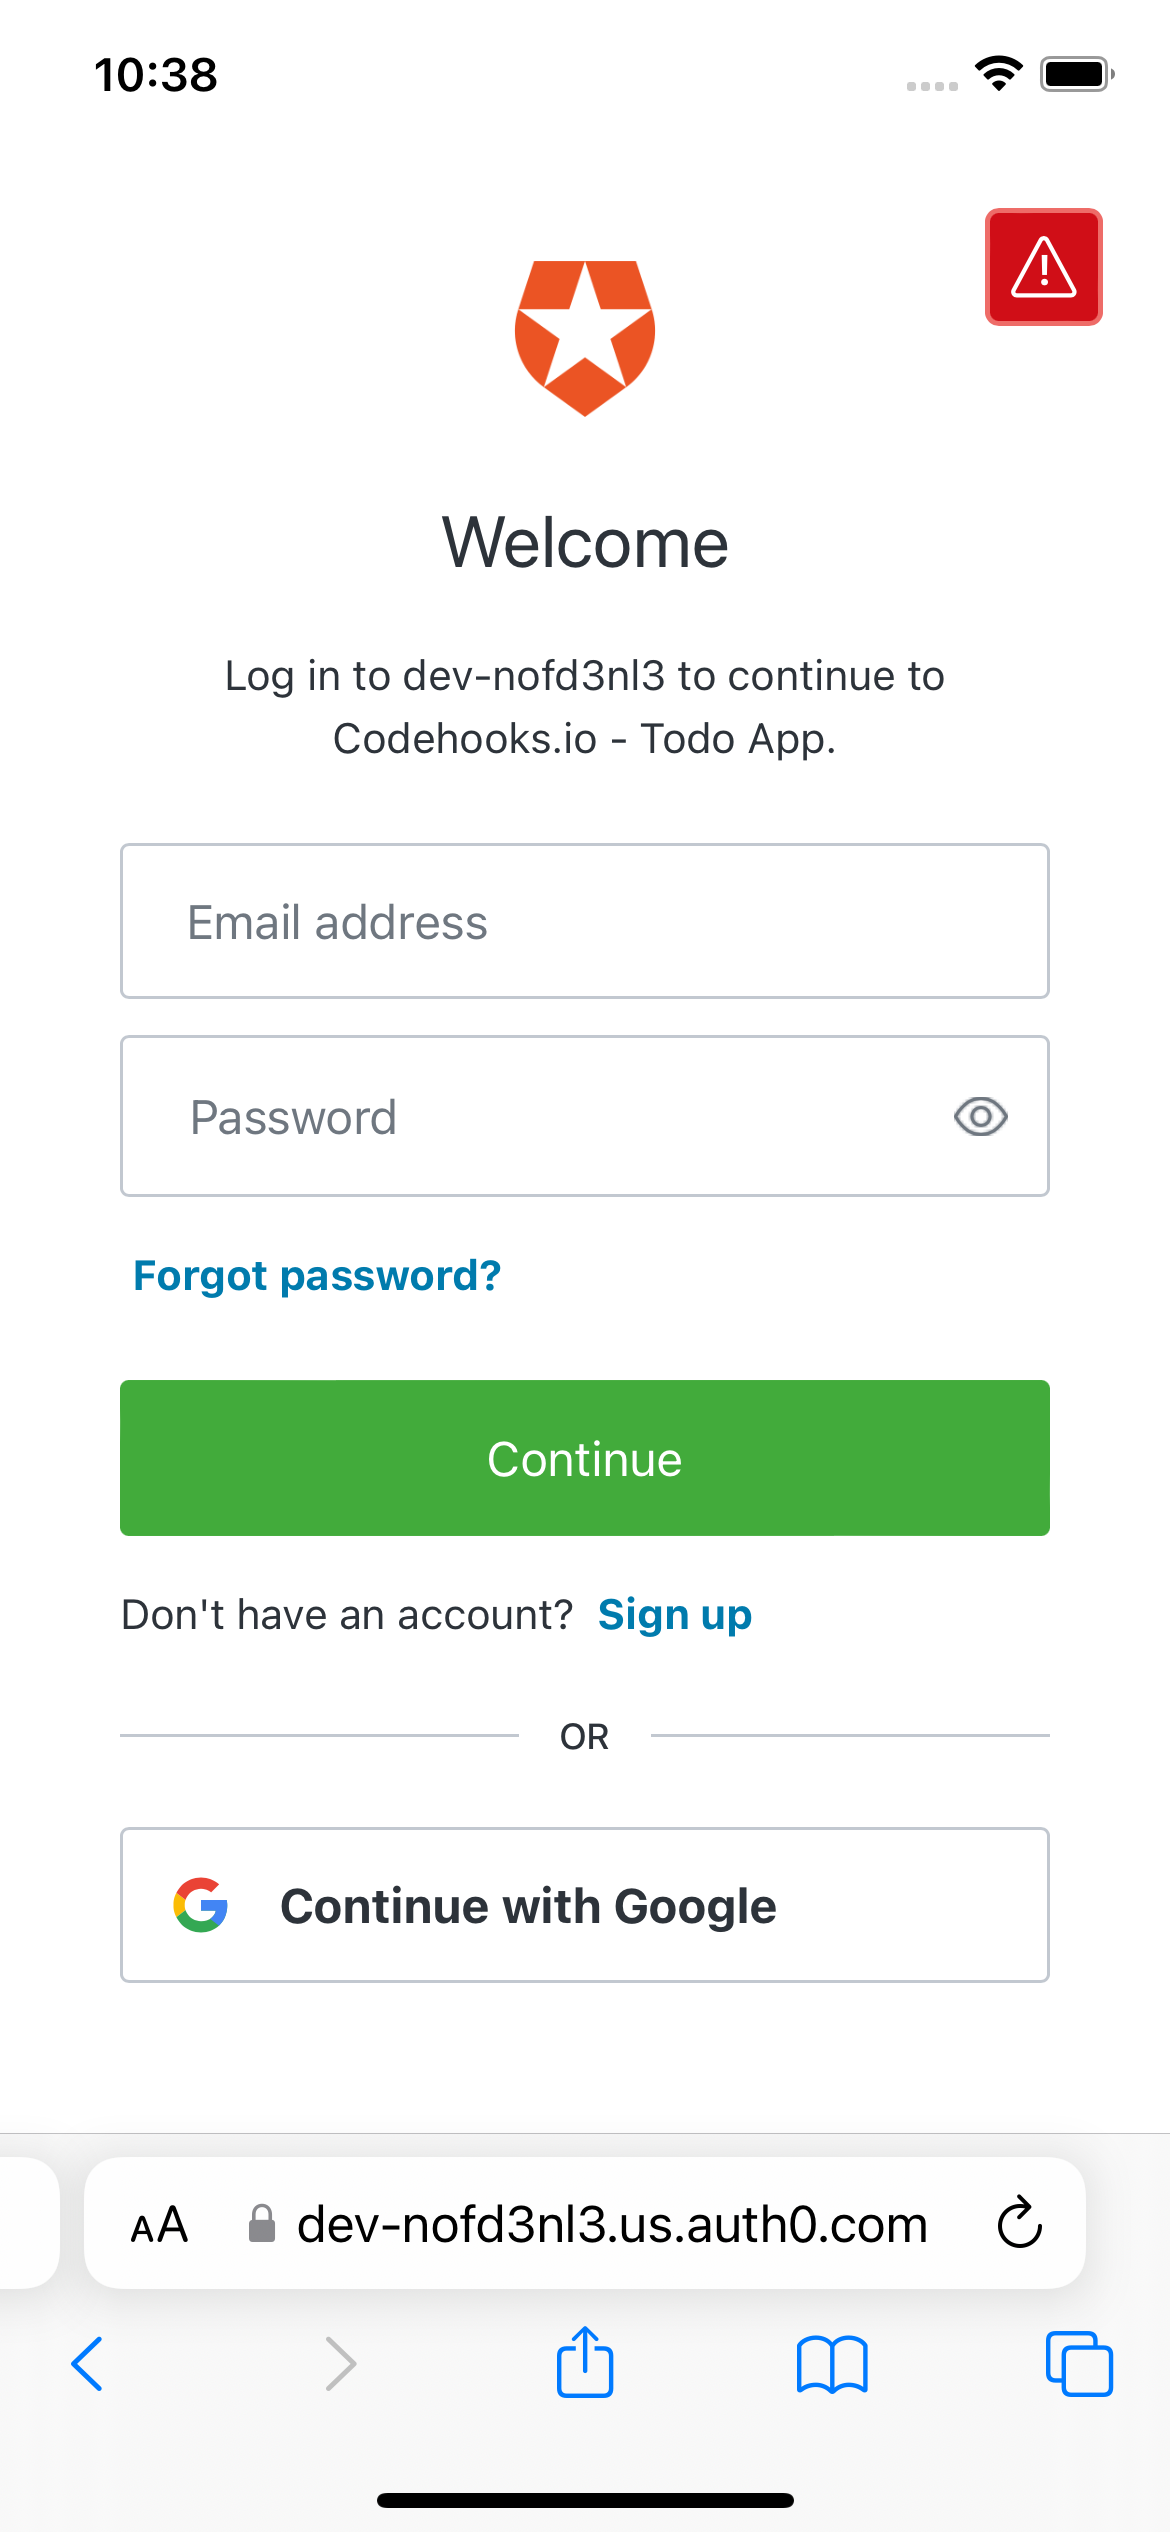
Navigate to http://localhost:3000 and you should see the App login screen similar to the screenshot shown below:
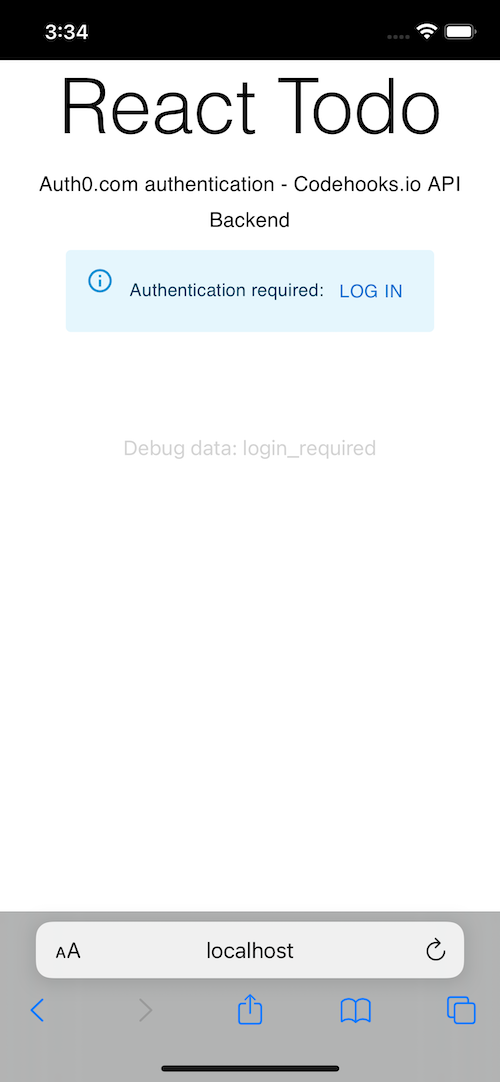
Clicking the Log In button opens the Auth0 shield.
The App.js main logic file
The main logic of the React Todo App is contained in the App.js code.
The full code example is shown below.
import { Box, Typography, Button, Alert } from '@mui/material';
import React, { useEffect, useState } from 'react';
import './App.css';
import TodoForm from './components/TodoForm';
import TodoList from './components/TodoList';
import { useAuth0 } from '@auth0/auth0-react';
import LogoutButton from './components/LogoutButton';
import Profile from './components/Profile';
import config from './config.json';

const { apiOrigin } = config;

function App() {
  const [state, setState] = useState({
    todoItems: [],
    showResult: false,
    apiMessage: '',
    error: null,
  });
  const {
    user,
    isAuthenticated,
    isLoading,
    getAccessTokenSilently,
    loginWithPopup,
    loginWithRedirect,
    getAccessTokenWithPopup,
  } = useAuth0();

  useEffect(() => {
    // fires when app component mounts to the DOM
    console.log('init useEffect');

    callApi().catch((error) => console.error('Init error', error));
  }, []);

  const callApi = async () => {
    try {
      const token = await getAccessTokenSilently();
      const response = await fetch(`${apiOrigin}/todo`, {
        headers: {
          Authorization: `Bearer ${token}`,
        },
      });
      console.log('Fetch data', response.status, response.statusText);
      let responseData = await response.json();
      console.log('Get data', responseData);
      responseData = responseData.map((todo) => {
        if (todo.completed === undefined) {
          todo.completed = false;
        }
        return todo;
      });

      if (responseData) {
        setState({
          ...state,
          todoItems: responseData,
          error: null,
        });
      }
    } catch (error) {
      console.error('API error', error);
      setState({
        ...state,
        error: error.error || error.message,
      });
    }
  };

  const handleLoginAgain = async () => {
    try {
      await loginWithPopup();
      setState({
        ...state,
        error: null,
      });
    } catch (error) {
      setState({
        ...state,
        error: error.error,
      });
    }

    await callApi();
  };

  const handleConsent = async () => {
    try {
      await getAccessTokenWithPopup();
      setState({
        ...state,
        error: null,
      });
    } catch (error) {
      setState({
        ...state,
        error: error.error,
      });
    }

    await callApi();
  };

  const handle = (e, fn) => {
    e.preventDefault();
    fn();
  };

  async function addTodo(todo) {
    // adds new todo to beginning of todos array

    const token = await getAccessTokenSilently();
    console.log('add', todo);
    const response = await fetch(`${apiOrigin}/todo`, {
      method: 'POST',
      headers: {
        Authorization: `Bearer ${token}`,
        'content-type': 'application/json',
      },
      body: JSON.stringify(todo),
    });
    console.log('Post data', response.status, response.statusText);
    let responseData = await response.json();
    console.log('Post data response', responseData);
    await callApi();
  }

  async function toggleComplete(_id) {
    // find item
    let todoUpdated = state.todoItems.filter((todo) => {
      return todo._id === _id;
    });
    todoUpdated = todoUpdated[0]; // first item
    todoUpdated.completed = !todoUpdated.completed;

    const token = await getAccessTokenSilently();
    console.log('add', todoUpdated);
    const response = await fetch(`${apiOrigin}/todo/${_id}`, {
      method: 'PUT',
      headers: {
        Authorization: `Bearer ${token}`,
        'content-type': 'application/json',
      },
      body: JSON.stringify(todoUpdated),
    });
    console.log('Put data', response.status, response.statusText);
    let responseData = await response.json();
    console.log('Put data response', responseData);
    await callApi();
  }

  async function removeTodo(_id) {
    const token = await getAccessTokenSilently();
    console.log('delete', _id);
    const response = await fetch(`${apiOrigin}/todo/${_id}`, {
      method: 'DELETE',
      headers: {
        Authorization: `Bearer ${token}`,
        'content-type': 'application/json',
      },
    });
    console.log('Delete data', response.status, response.statusText);
    let responseData = await response.json();
    console.log('Delete data response', responseData);
    await callApi();
  }

  return (
    <div className="App">
      <Typography variant="h2">React Todo</Typography>
      <Typography style={{ padding: 10 }} variant="subtitle1">
        Auth0.com authentication - Codehooks.io API Backend
      </Typography>

      <Profile />

      {state.error === 'login_required' && (
        <Alert severity="info">
          Authentication required:{' '}
          <Button variant="text" onClick={() => handleLoginAgain()}>
            Log In
          </Button>
        </Alert>
      )}
      {state.error === 'consent_required' && (
        <Alert severity="warning">
          API concent required:{' '}
          <Button variant="text" onClick={() => handleConsent()}>
            Grant
          </Button>
        </Alert>
      )}
      {isAuthenticated && <TodoForm addTodo={addTodo} />}

      <Box sx={{ margin: '2em' }}>
        <TodoList
          todos={isAuthenticated ? state.todoItems : []}
          removeTodo={removeTodo}
          toggleComplete={toggleComplete}
          isAuthenticated={isAuthenticated}
        />
      </Box>

      <Box>
        {isAuthenticated ? <LogoutButton /> : ''}
        {state.error !== null && (
          <Box sx={{ color: 'lightgrey' }}>Debug data: {state.error}</Box>
        )}
      </Box>
    </div>
  );
}

export default App;
This example App was deployed using Github pages, read more about it here.
Conclusion
In this blog post, we have demonstrated how to develop and deploy a full-stack React Todo App with user authentication and secure database REST APIs. By following the step-by-step guide, you have learned how to create a practical example using React, Auth0 for authentication, and a backend NoSQL database and API using codehooks.io.
We started by introducing the concept of a Todo App as a popular way to learn and understand a technology stack. We then provided an overview of the technologies used in our example, including React, Auth0, Material UI, and deployment to Github Pages.
The blog post guided you through three easy steps to create the React Todo App. First, we covered user authentication using Auth0. We explained how to set up an Auth0 account, create a new Auth0 application, and obtain the necessary credentials. We also discussed alternative identity management platforms like Clerk.com.
Next, we focused on the backend API and database. We demonstrated how to install the Codehooks CLI and create a new backend application. We explained the integration of Auth0 using JWKS (JSON Web Key Sets) and provided the code for the backend Todo Application's data API.
Finally, we moved on to the React frontend client application. We explained how to kick-start the React App using create-react-app and install the required packages. We provided the code for the entrypoint file, index.js, and the main logic file, App.js. We also discussed how to set up the configuration credentials for Auth0 and the REST API.
Throughout the blog post, we emphasized the importance of user authentication, JWT (JSON Web Tokens), and data isolation. We showcased the finished React Todo App and highlighted its key features.
By following this example, you have gained valuable insights into full-stack development and learned how to integrate user authentication, secure APIs, and a NoSQL database in a React application.
Feel free to explore and build upon the example code provided in this blog post. Use it as a foundation to create more complex applications and enhance your full-stack development skills.
Happy coding! 💪